Tamar Campaign Battle 2: Breakthrough Conquest
Week of November 11, 3022: The second week of action sees the Daunt’s Fusiliers (DF) mercenary company following up on their major victory in the Tamar Inlet Peninsula. The breakthrough attempt of the Lyran-hired mercenaries, led personally by Captain Kyle himself in his Maruader, seeks to put overall victory within reach with this conquest battle.
Though they are the attacking forces as contracted by the Draconis Combine, ever since landing upon Tamar the Phoenix Armament (PA) mercenary company has been on the defensive. Whether through a poor initial landing or advanced warning, none can say at the time of this report.
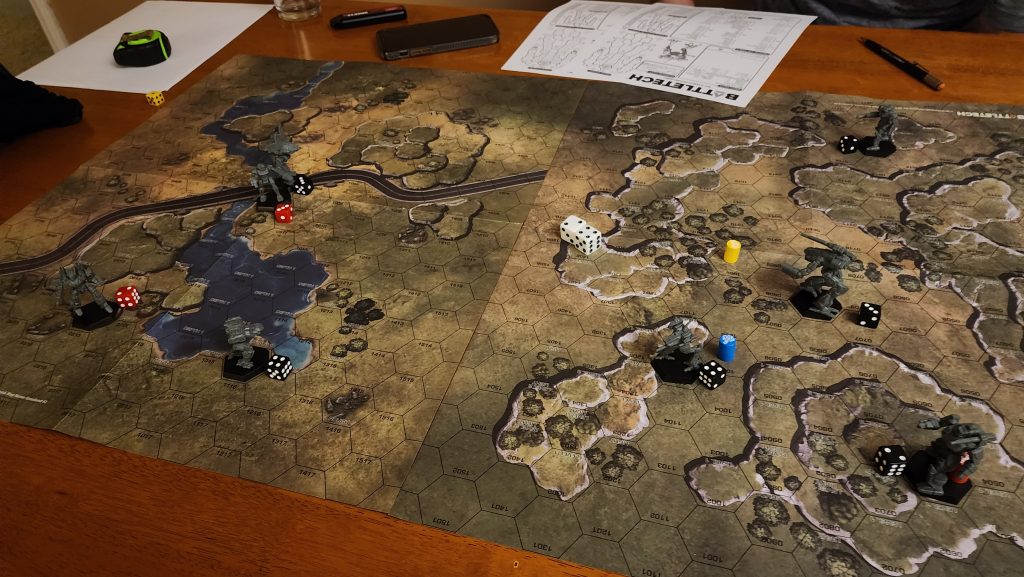
A lance from each company deployed on the plains and gently rolling hills outside the city of Shonick Dale. Each force constructed an FOB and an HQ nearby and the lances are tasked with both defensive and offensive operations. Securing the enemy HQ would be difficult but ultimately could lead to a complete victory.
Following deployment the more nimble light mechs of Daunt’s Fusiliers charge forward, a Spider moving to ensure that their own FOB is secure while the other, a Jenner, moving to put pressure on the enemy’s FOB. The lumbering Marauder takes up position near it’s HQ and the fearsome Hunchback slowly advances to support the Jenner.
The Phoenix Armament lance, led by a Catapult, features 4 slower but overall more adaptive mechs that all feature jump jets which will come in handy over the rolling hills of part of the battlegrid. The lance slowly advances, disregarding their own HQ in an effort to deny the enemy and put more pressure forward.
In the opening stages of the battle, the western flank, consisting of DF’s Hunchback and Jenner square off against the PA’s Catapult, Panther and Enforcer. The 3 on 2 clash initially goes well for the few opening rounds, with several AC/20 blasts ensuring that the Fusiliers were giving more damage than they received, despite being outnumbered and outweighed. One blast completely blows off the Catapult’s right arm. And thanks to the overall faster speed of the Jenner, the Fusiliers opened scoring to a 3-0 gap.
On the Eastern flank, a lone PA Wolverine presses forward slowly and cautiously. Not able to put pressure on the enemy’s FOB with a distant Maruader keeping watch, he’s content to standby and fire at range, keeping at the ready.
The deficit, while not insurmountable, puts the PA lance behind and looking to put some hurt on the enemy lance as outscoring them from this point, without creating losses, has become difficult.
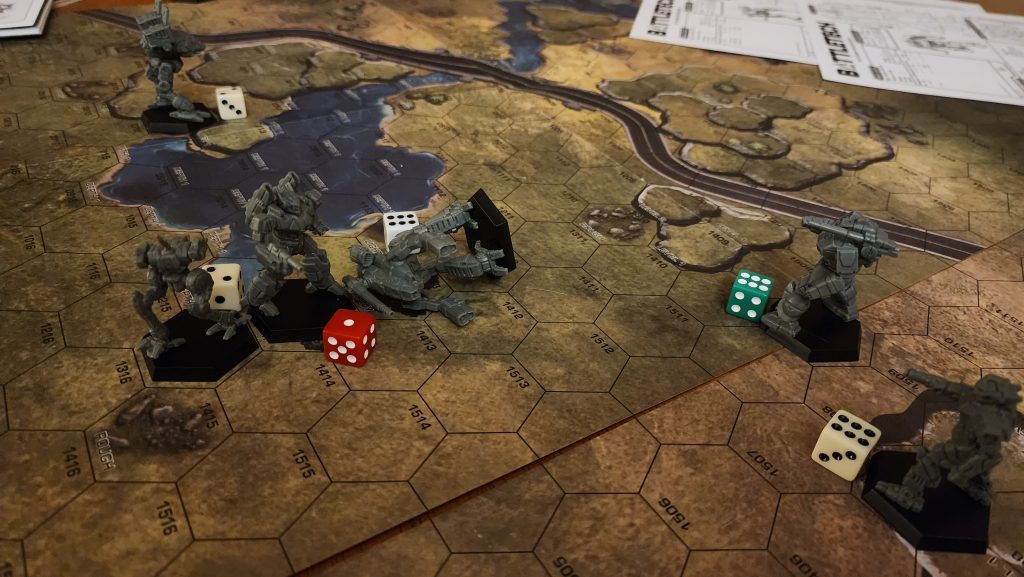
Initially kept in reserve while defending the HQ, the commander’s Marauder moves forward to reinforce the outgunned left flank. His superior firepower and armor, not to mention gunnery skills, could surely help put the final blow on the PA company.
These hopes crumble as his advance is not nearly quick enough to prevent the fall and crippling of the Jenner, who did not disengage when badly needed due to overheating. A double engine hit following a knockdown means even if the poor Jenner survives, it will likely be broken up for salvage. For a short while, it continues to fire once or twice in defiance from its prone position, unable to get back up, but eventually is silenced when an arm, and then the center torso is destroyed.
The hunchback continues to weather an enormous amount of fire, not yet benefitting from the Marauder’s covering fire until an extremely unlucky blow to its center torso smashes the engine and a gyro. Miraculously it does not topple despite the gyro hit, but the pilot radios his commander, relaying that he will be slowly withdrawing from the fight back towards HQ.
Unable to press on the left flank, the DA offensive is stopped in its tracks. Finally able to make its presence truly felt, the combined firepower of the Hunchback and the Marauder is able to exact some amount of vengeance and completely destroy the nearby Panther.
Meanwhile the western flank has turned into a stalemate between the Spider, whose defensive piloting has denied the PA Wolverine any chance at scoring points, but ensured very little fire has hit home. Only once was the Wolverine able to capitalize and score one point while the Spider made an error in landing when it jumped into a thickly wooded spot near the FOB, almost destroying his right arm in the process.
With reinforcements drawing near (signaling the end of the battle), the Phoenix Armament Enforcer jumps out and back, moving back towards its HQ to score precious points while the Catapult stands guard over the FOB. The score is now tied at 3-3 and the situation is becoming desperate. Despite initially being wounded, the concentrated fire that the Panther drew left the Catapult unscathed. The Hunchback, continuing to walk backwards in retreat is unable to help turn the tide, unwilling to risk running with a damaged gyro.
At the last possible moment, the initiative of the Wolverine allows the PA to grab a final point from taking the Fusilier’s FOB, bringing the score to 4-3 and bringing victory to the Phoenix Armament. The major victory and securing of the battlefield means that the Draconis Combine mercenaries are able to recover the two destroyed mechs, the Panther and Jenner- helping to make up for the loss of their Raven in the first defeat last week.
The commander of the Phoenix Armament, having received the report, readies his forces to counterattack.
Game Breakdown
This game was played over two separate nights. At the end of the first night which was through 5 rounds, we both felt that the PA lance was in deep trouble and would hard-pressed to climb out of the 3-0 hole. And he was able to just that.
The major decisive point in the battle was losing the Jenner which, coupled with an extremely lucky TAC to the center torso of the Hunchback which led to a roll of 10 (two crits) meant that any chance to do anything on that side of the battlefield was gone. Truth be told though, the mistake happened because I essentially forgot the Jenner needed to withdraw to cool down, and instead charged headlong into close combat. So at 7 heat, the Jenner ran in and got smoked.