Tamar Campaign Battle 1: Contact Tamar Campaign Battle 1: Contact
  • Video Gaming
    • Video Gaming Home
    • Video Game Blog
  • Board Gaming
    • Board Gaming Home
    • Board Game Blog
  • Battletech
    • Battletech Home
    • Tamar Campaign
    • Daunt’s Fusiliers
  • 40k
    • 40k Home
    • Horus Heresy Timeline
  • Blog
  • Video Gaming
    • Video Gaming Home
    • Video Game Blog
  • Board Gaming
    • Board Gaming Home
    • Board Game Blog
  • Battletech
    • Battletech Home
    • Tamar Campaign
    • Daunt’s Fusiliers
  • 40k
    • 40k Home
    • Horus Heresy Timeline
  • Blog

April 2023

Tamar Campaign Battle 1: Contact

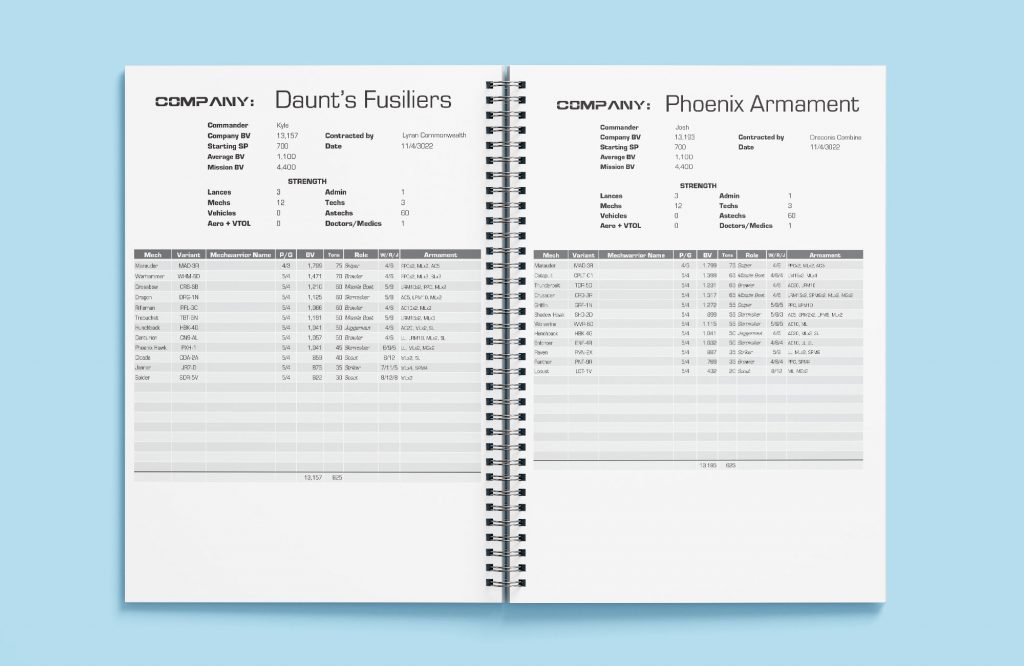
Week of November 4, 3022: The invasion of the Lyran Commonwealth’s critical border world of Tamar, capital of the sector commenced as multiple Draconis Combine forces land. Among the invading forces is the mercenary company Phoenix Armament, recently contracted to assist in the attack.

The Combine picked an opportune time to stage the assault with defending forces at an all time low. To help turn the tide, Lyran Commonwealth officials led by the Duke of Tamar himself, recruited the Daunt’s Fusiliers mercenary company.

Upon their dropship’s descent, the Phoenix Armament’s deployment was discovered and despite their intention to operate and strike clandestinely, they came under attack from a scout lance of the Fusiliers.

Seizing the initiative in the opening stages of the conflict, the Fusiliers move their lance in under strict orders to recon the enemy, capturing scans and imagery of their supplies, and escape back to their base of operations.

Just after initial deployment. On the left (South) the Fusiliers move towards the possible cache locations on the right (marked by the colored cylinders – one of which is directly behind the Shadowhawk. Note: there’s at least a couple stand-ins, most notably the MAD is actually a Raven.

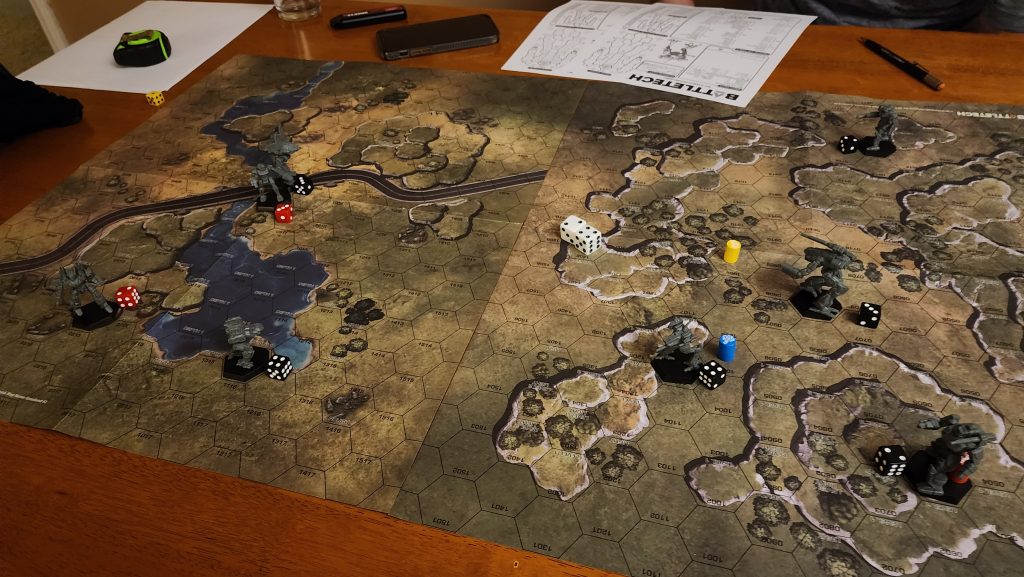
Led by a Trebuchet, the Lyran-contracted mercenaries move in swiftly, scanners picking up three possible locations that the cache may be located. Light mechs, a Spider and Cicada, charge ahead of the Trebuchet and the Phoenix Hawk.

The cicada moves to the first reading that is a bit further West of the other two. The spider provides additional backup but cannot close to confirm the readings so it’s all on the Cicada, with the enemy closing around fast. With little to no close support, the Cicada is able to confirm that the reading is genuine and grabs several pictures of the cache, then moves to disengage.

The Cicada (right) finishes photographing the cache while managing to dodge the majority of incoming fire. Note the MAD is a Raven, and the CAT at the back is actually a Trebuchet.

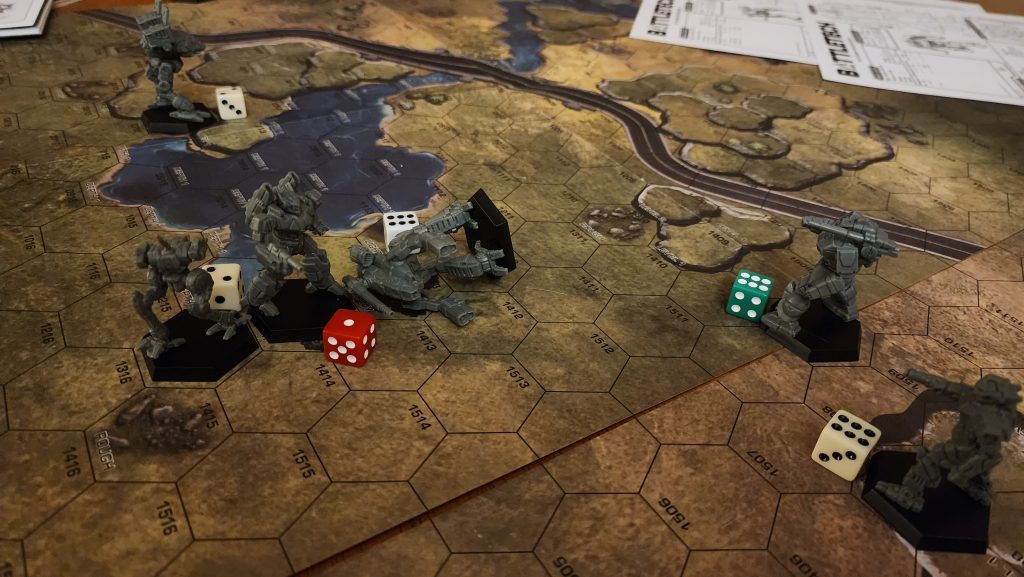
The Spider and the Phoenix Hawk jump into the fray while the Cicada peels back, causing mayhem and damage but the PA Mercenary Force mechs do not suffer too greatly. Unable to match speed, the Cicada breaks free while the furball carries the action into an open field near the lake.

The Cicada escapes under the covering fire of its lancemates.

In the final stages as the Cicada completes its withdrawal to successfully finish the mission, Fusilier mechs manage to score a lucky shot to knock down the Combine Raven, then scoring a crippling kick to the center torso that secures the secondary objective in favor of the Lyran Commonwealth mercenaries.

With no hope of catching the Cicada and preventing its data from falling into the enemy commander’s hands, the Phoenix Armament lance withdraws, leaving behind the ruined Raven.

With this important data in hand, the Fusiliers will look to form a better strike plan in a follow up battle next week. He sets about formulating his plan for attack…

The Raven (MAD stand-in) is knocked down and subsequently put out of its misery in the final stages of the fight.

——-

A few things led to my decisive victory here- most notably that upon scanning the first of the three objectives, I found the one I was looking for. So by doing that, waiting a turn to photograph and running away immediately, meant I didn’t need to waste at least 1-2 turns moving to and scanning the other objectives. It was very fortunate.

The defenders (Phoenix Armament) lacked overall mobility which their commander insists cost them but I think it was a combination of bad luck and perhaps poor planning on the objectives in general. He saw the Phoenix Hawk and Spider as extremely agile mechs, which I needed and kept moving fast so it was very hard to hit them, but thought his own force lacked that sort of mobility.

Which it did, but I don’t think he needed the mobility that I needed when it came down to that mission.

Check out the next episode of the Tamar Campaign here:

BATTLE 2: BREAKTHROUGH CONQUEST

The second week of action sees the Daunt’s Fusiliers mercenary company following up on their major victory in the Tamar Inlet Peninsula.

Read More
Tamar Campaign Intro

Our first run-through of the Tamar Campaign (and DFA Campaign System) is reported on here, each battle being featured as a narrative post.

I balanced both sides to company strength, attempting to mix in a variety of mechs for each side while keeping BV and overall tonnage as balanced as possible. I even spent a fair amount of time balancing overall mobility and mech roles so each side had a different mix of units yet when it came time to choose for a given battle, there was enough to choose from.

For more info on the campaign itself, check out the Tamar Campaign page which features the rulebook and more background info.

Force List

Campaign Booklet Force List

Daunt’s Fusiliers Force Strength

  • Commander: Marauder MAD-3R
  • Warhammer WHM-6D
  • Crossbow CRS-6B
  • Dragon DRG-1N
  • Rifleman RFL-3C
  • Trebuchet TBT-5N
  • Hunchback HBK-4G
  • Centurion CN9-AL
  • Phoenix Hawk PXH-1
  • Cicada CDA-2A
  • Jenner JR7-D
  • Spider SDR-5V

Phoenix Armament Force Strength

  • Commander: Marauder MAD-3R
  • Catapult CPLT-C1
  • Thunderbolt TDR-5D
  • Crusader CRD-3R
  • Griffin GRF-1N
  • Shadow Hawk SHD-2D
  • Wolverine WVR-6D
  • Hunchback HBK-4D
  • Raven RVN-2X
  • Panther PNT-9R
  • LCT-1V

the First Battle:

As mentioned, this is meant to be more of a narrative retelling of the battles rather than a strictly turn-for-turn battle report. I figured I would tap into my own creative talents and offer something a little bit more unique. I’ll still include my own take on the battle, out of character, after each narrative write-up and I’ll include a few images from the game, but be warned, I have not painted any of my mechs and in a few instances we have a few mechs that are stand-ins for a mech I did not own.

As a foreword as well- neither of us are Battletech experts. I have quite a few games of MegaMek under my belt, but only recently purchased the AGOAC box set and a few other lances, but my adversary has zero experience outside of two games we played before diving into this campaign. To his credit though he’s picked up the gist of it extremely well and I’ve tried my best to give him extra pointers on overall strategy.

Check out the first episode of the Tamar Campaign here:

Battle 1: Contact

The invasion of the Lyran Commonwealth’s critical border world of Tamar, capital of the sector commenced as multiple Draconis Combine forces land. Among the invading forces is the mercenary company Phoenix Armament, recently contracted to assist in the attack.


Check out more about Daunt’s Fusiliers Mercenary Company
Read More
Daunt’s Fusiliers

Date: 3033

Strength: 3 mech companies and 1 augmented mech company

NOTABLE ACTIONS:

• Nox Quelling, 3031

• Kirchbach Offensive, 3029

• Battle for Hainfeld, 3028

• Battle of Tamar, 3022

• Garrison of Hyperion, 3018-3020

• Raid of Harvest, 3017

More bio to come…

Read More

Recent Posts

  • 40K Forbidden Stars: The best 40k Board game you’ll likely never play
  • Battlebit Early Access Launch
  • Falling Frontier: Coming soon
  • 40k Boltgun: First Impressions
  • Legend of Zelda: Tears of the Kingdom First Impressions

Archives

  • February 2024
  • June 2023
  • May 2023
  • April 2023
  • March 2023
  • January 2023

Categories

  • Battletech
  • Board Game Reviews
  • Video Game First Impressions
  • Video Game Previews
  • Video Game Reviews
Copyright © kylebb.com 2023